In affiliate marketing accurate conversion tracking is the backbone of any campaign. By integrating the ROIads ad network with PeerClick tracker you get powerful tools to analyze traffic, see performance metrics and optimize your campaign.
This guide will walk you through the process of integrating ROIads ad network with PeerClick tracking to set up S2S postback tracking, increase campaign transparency and potentially boost your ROI.
What Is Postback and Conversion Tracking?
S2S (server-to-server) postback is an automated notification system that facilitates data transfer between different platforms, such as ad networks, affiliate networks, and trackers. It plays a crucial role in tracking specific actions like registrations, purchases, or subscriptions. By attributing data from these sources to the corresponding traffic information (e.g., ad campaigns, creatives, and traffic channels), postback ensures precise performance tracking and allows for a more detailed analysis of campaign success. In affiliate marketing, integrating postback is essential for understanding conversion paths and optimizing traffic sources effectively.
How Postback Integration Works in Affiliate Marketing
Once postback is integrated, it works as a tracking funnel, linking and collecting data from all connected sources:

- Click: User clicks on your ad and lands on the offer or landing page.
- Conversion: User completes the desired action (e.g. buys, subscribes or installs an app) the CPA network records the event.
- Data Passing: The affiliate network or advertiser (e.g., the source of the offer) sends conversion data to the tracker (e.g., PeerClick). The tracker then signals the integrated ad network (e.g., ROIads) to attribute the conversion to the appropriate traffic source.
- Tracking: PeerClick logs the conversion data and associates it with the click ID of the action recorded by the ad network.
Key Benefits of Using PeerClick Tracker with ROIads
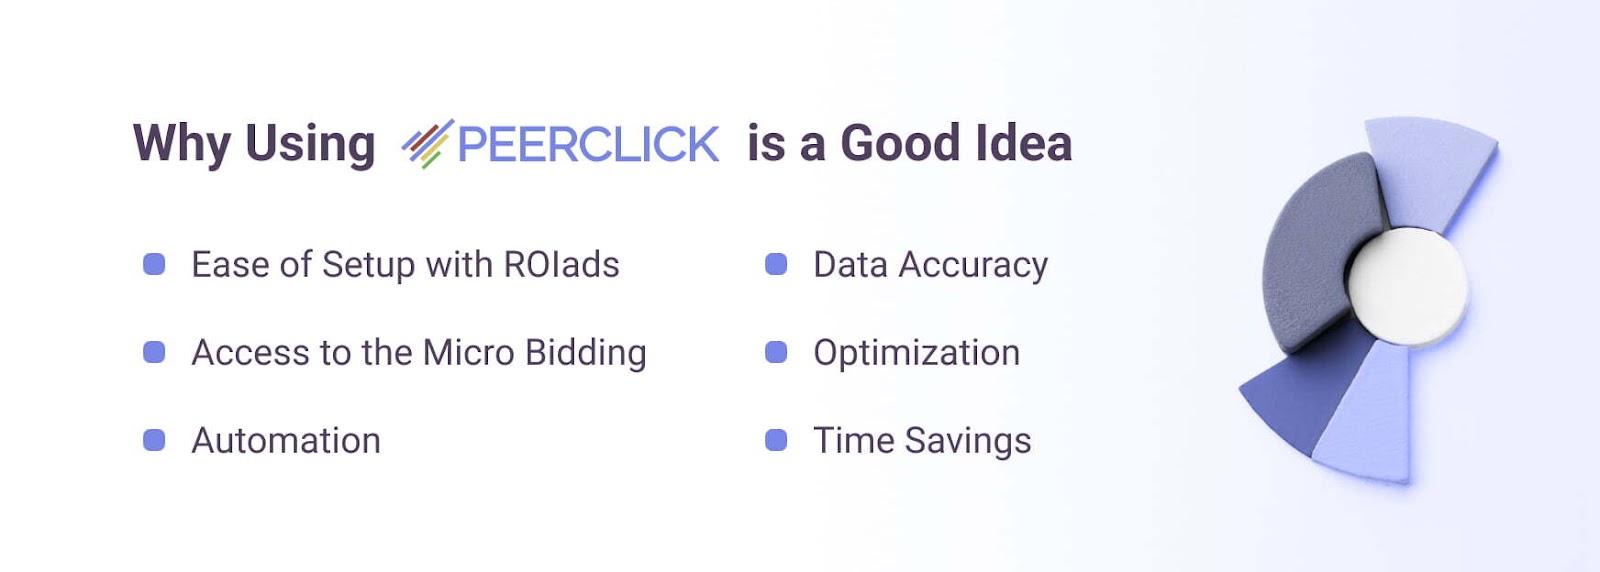
- Automation: Postback tracking eliminates the need for manual data updates, every conversion is logged instantly.
- Data Accuracy: Conversion data is sent without errors, so you get precise analytics.
- Optimization: Postback tracking helps you to identify top performing traffic sources and detect underperforming sources.
- Time Saving: Automated data transfer gets you campaign analysis faster and actionable insights.
- Setup: ROIads is pre-integrated with PeerClick so postback setup is easy with ready to use templates.
Micro Bidding Requires Accurate Conversion Tracking
One of the cool features of ROIads is the Micro bidding tool, where advertisers can manually adjust bids for specific traffic sources like individual sites or publishers. But conversion tracking is required for this tool to work. Without conversion tracking in place you can’t configure Micro bidding as the network needs precise data to analyze and determine the performance of individual placements.
Now that you understand the fundamentals, let’s dive into the step-by-step guide to setting up PeerClick ads tracking integration.
How to Set Up Conversion Tracking in PeerClick: A Step-by-Step Guide
This guide will walk you through adding ROIads, your affiliate network, and your offer to PeerClick as data sources. By setting up these integrations, you’ll be able to track conversions accurately and optimize ad performance effectively.
What You’ll Learn in This PeerClick Setup Guide:
- Adding ROIads as a Traffic Source
How to add ROIads to PeerClick tracker as a traffic source. This is the most important step to capture and track your traffic data for your campaigns.
- Integrating Your Affiliate Network
How to connect your affiliate network to PeerClick so the tracker can pull and process data including offer specific metrics.
- Configuring an Offer in PeerClick
How to set up your CPA offer in PeerClick. This will link conversion data collection from the affiliate network to traffic data from ROIads.
- Creating Tracking Campaigns in PeerClick
Combine your traffic sources, offers and affiliate networks into one ads tracking campaign in PeerClick to unite data collection.
If you are a direct advertiser, you need to integrate your website directly with the tracker. You can find instructions on how to do this on PeerClick’s website.
Step 1: Adding ROIads as a Traffic Source in PeerClick Conversion Tracker
The first step in setting up conversion tracking in PeerClick is — adding ROIads as a traffic source.
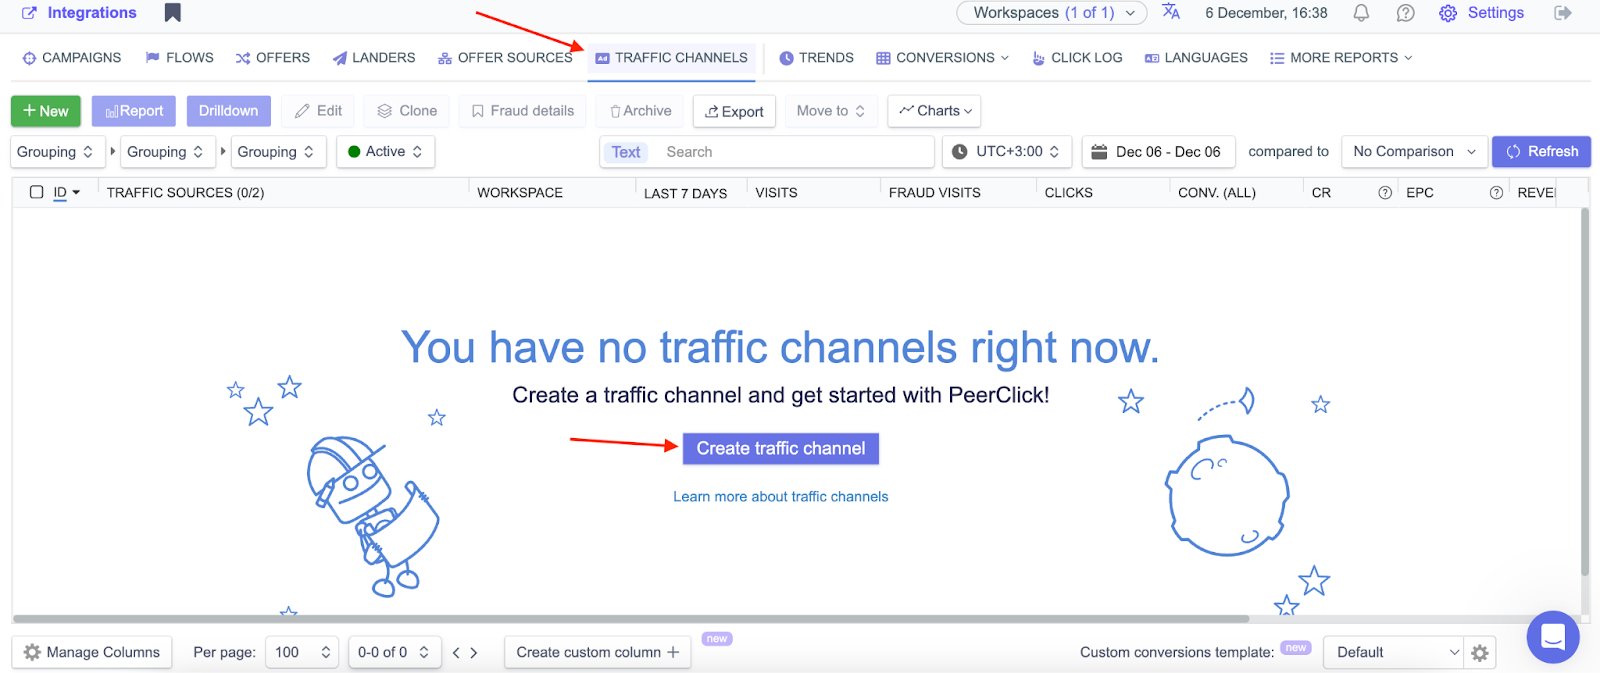
1. Go to the “Traffic channels” tab in the top menu of the PeerClick dashboard to add the traffic source. Click “Create traffic channel” in the opened window.
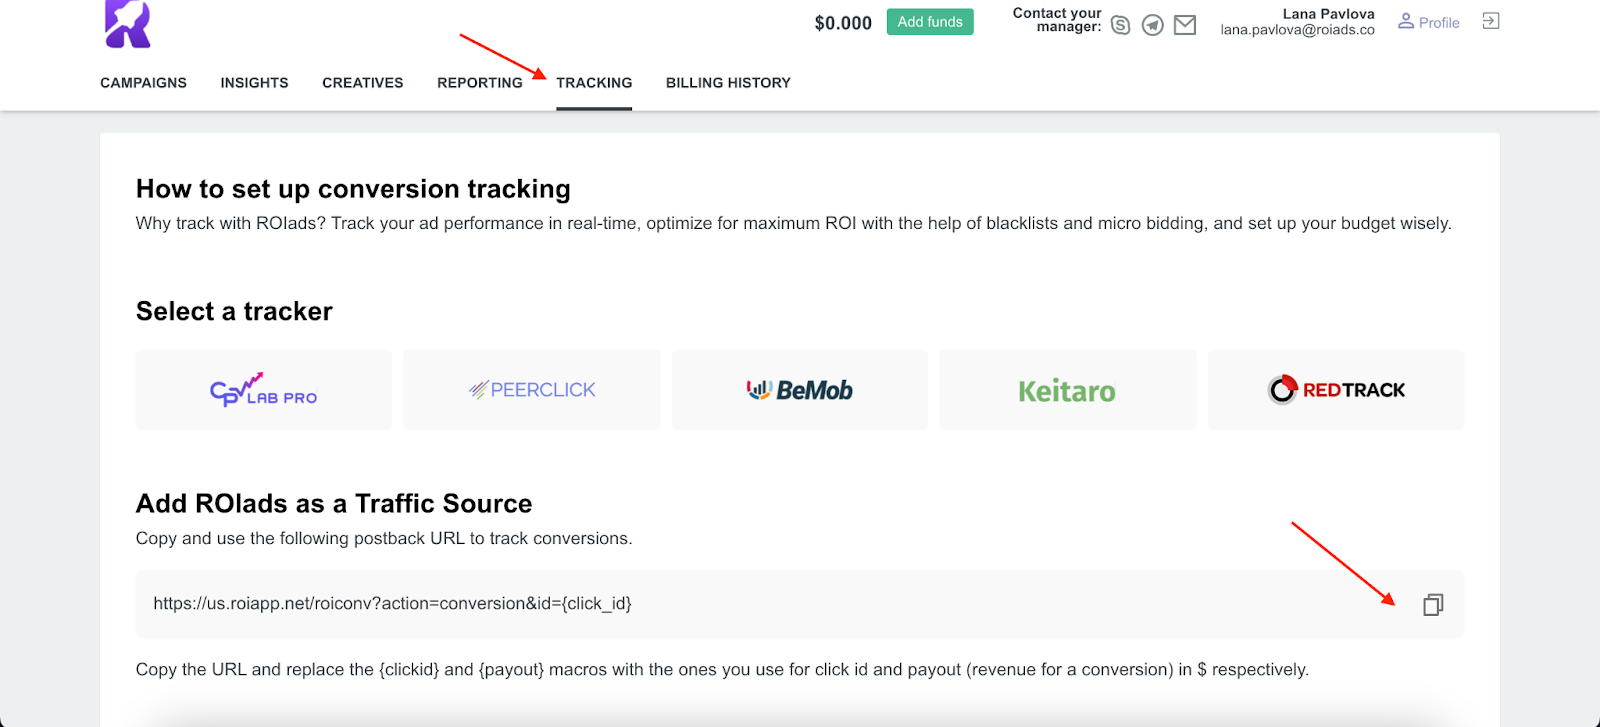
2. Go to the ROIads dashboard, click on the “Tracking” tab and copy the postback URL to your clipboard.
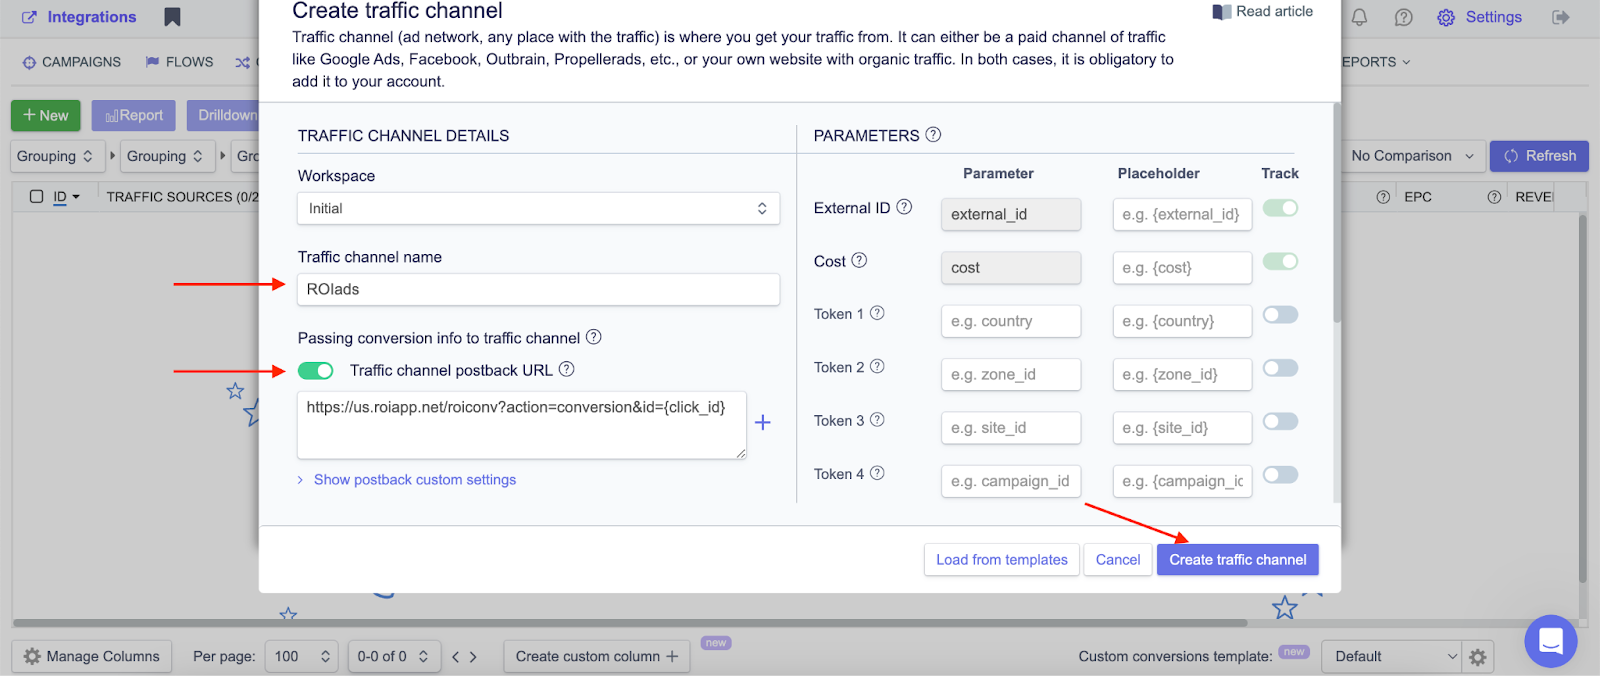
3. Go back to PeerClick. Name the traffic channel, enable the “Traffic channel postback URL” and click “Create traffic channel”
Now you need to integrate your affiliate network, set up your offer and postback. Let’s move on!
Step 2: Setting Up Your Affiliate Network to PeerClick Tracker
PeerClick has prebuilt templates for many affiliate networks, making the setup process easier. In this guide we’ll use Leadbit as the example affiliate network. Here’s how to add it:
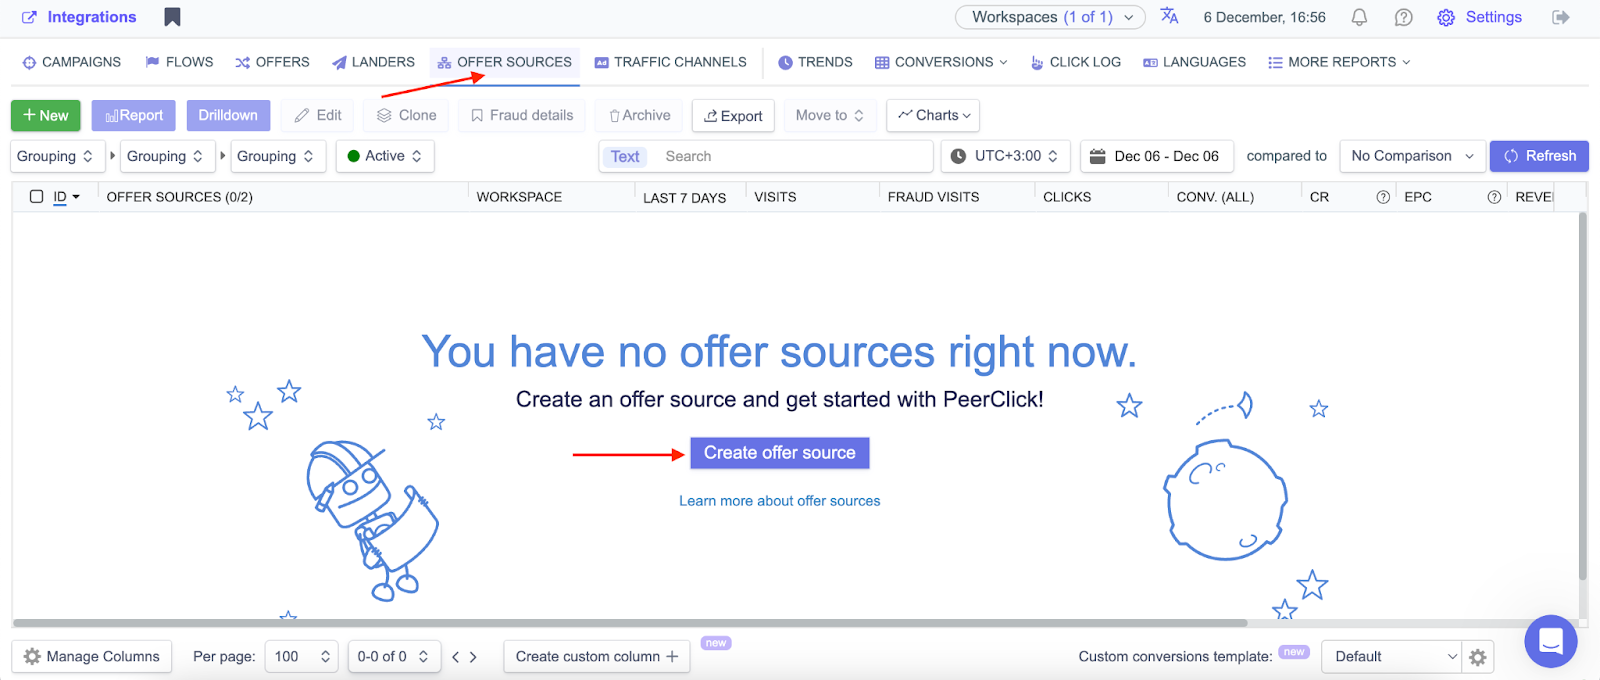
1. Go to “Offer sources” in the top menu of PeerClick. Click “Create offer source”.
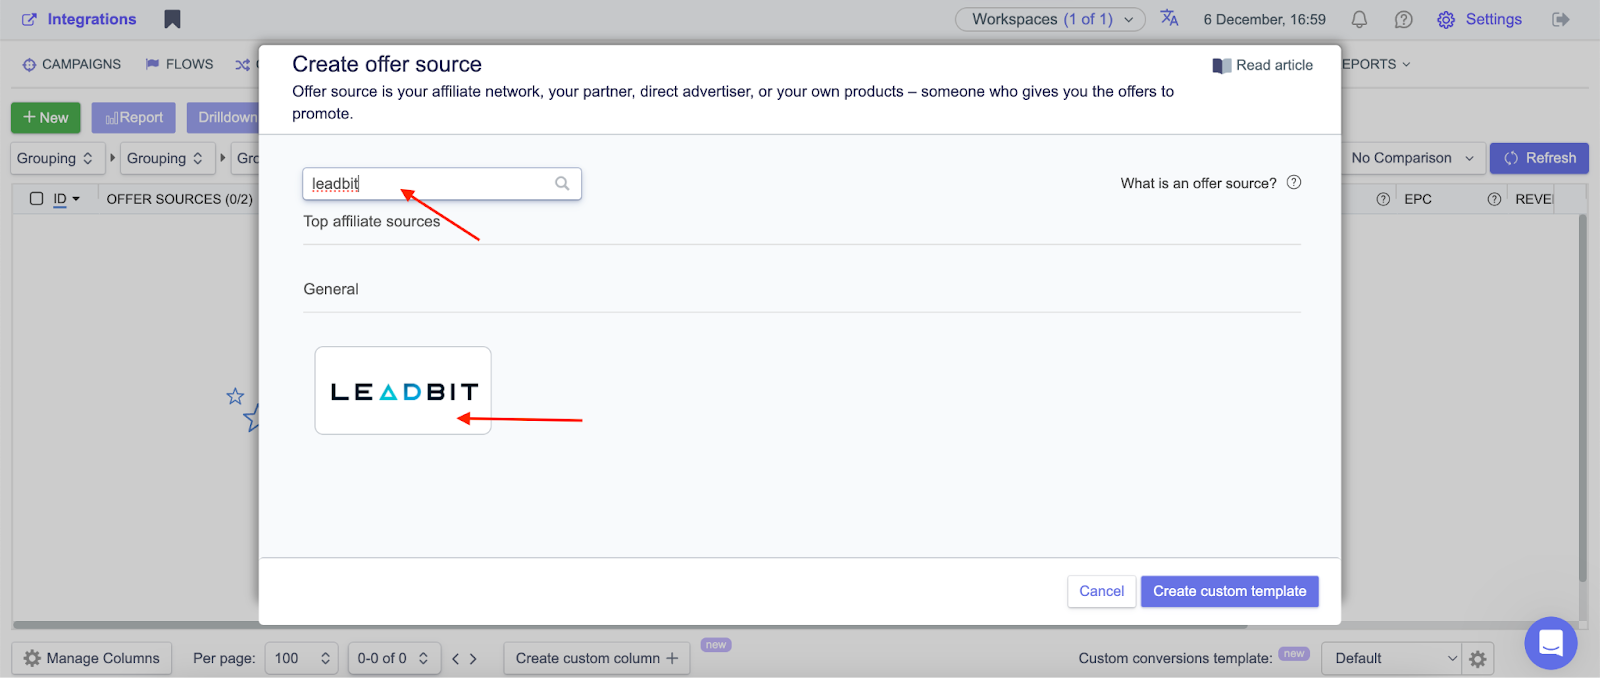
2. Search for your affiliate network and click on its logo.
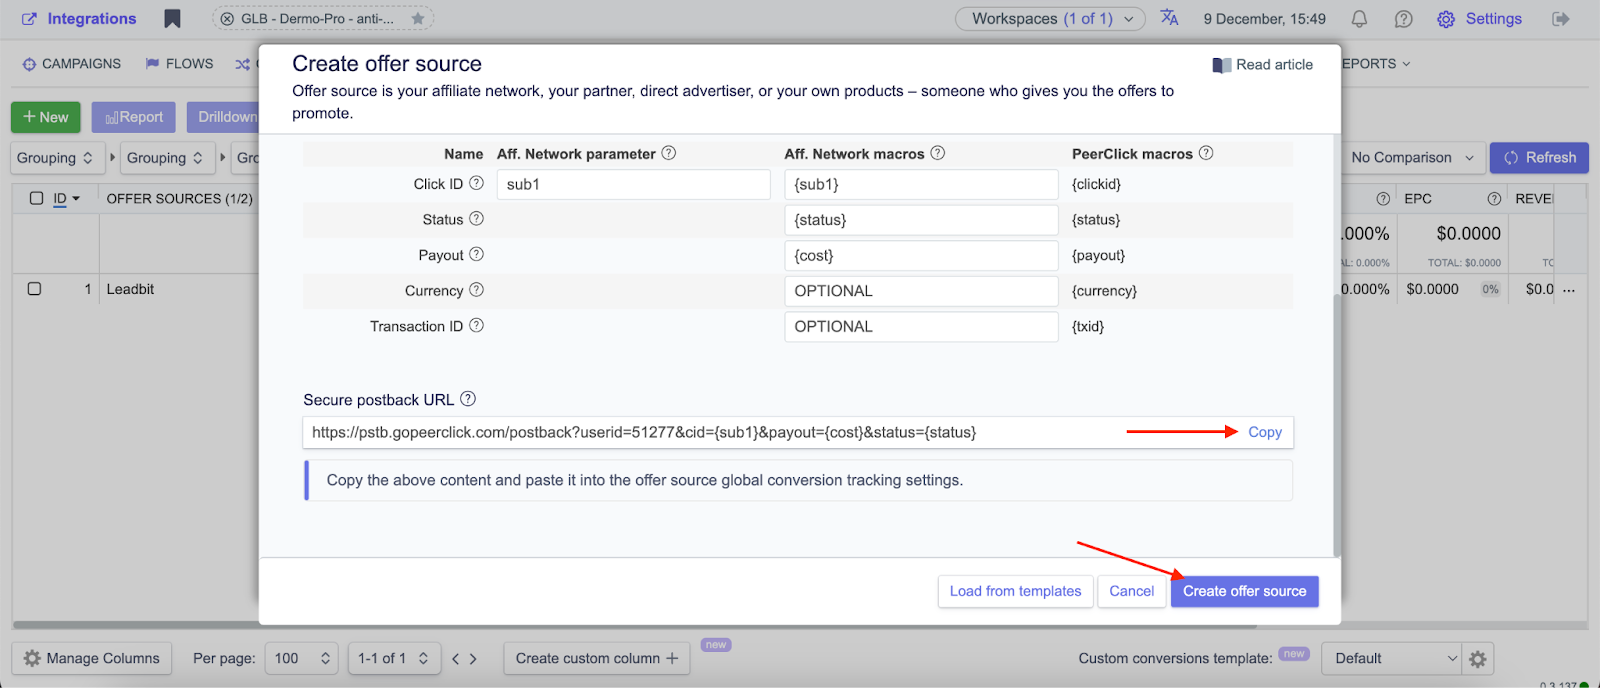
3. In the window that opens, click “Create offer source”. You need to scroll down, copy the content of the “Conversion tracking” section and save the Postback URL. All other data will be filled in automatically. After that, click on the “Create offer source” button.
Step 3: Adding a CPA Offer in PeerClick
After you’ve set up the affiliate network, the next step is to add the offer:
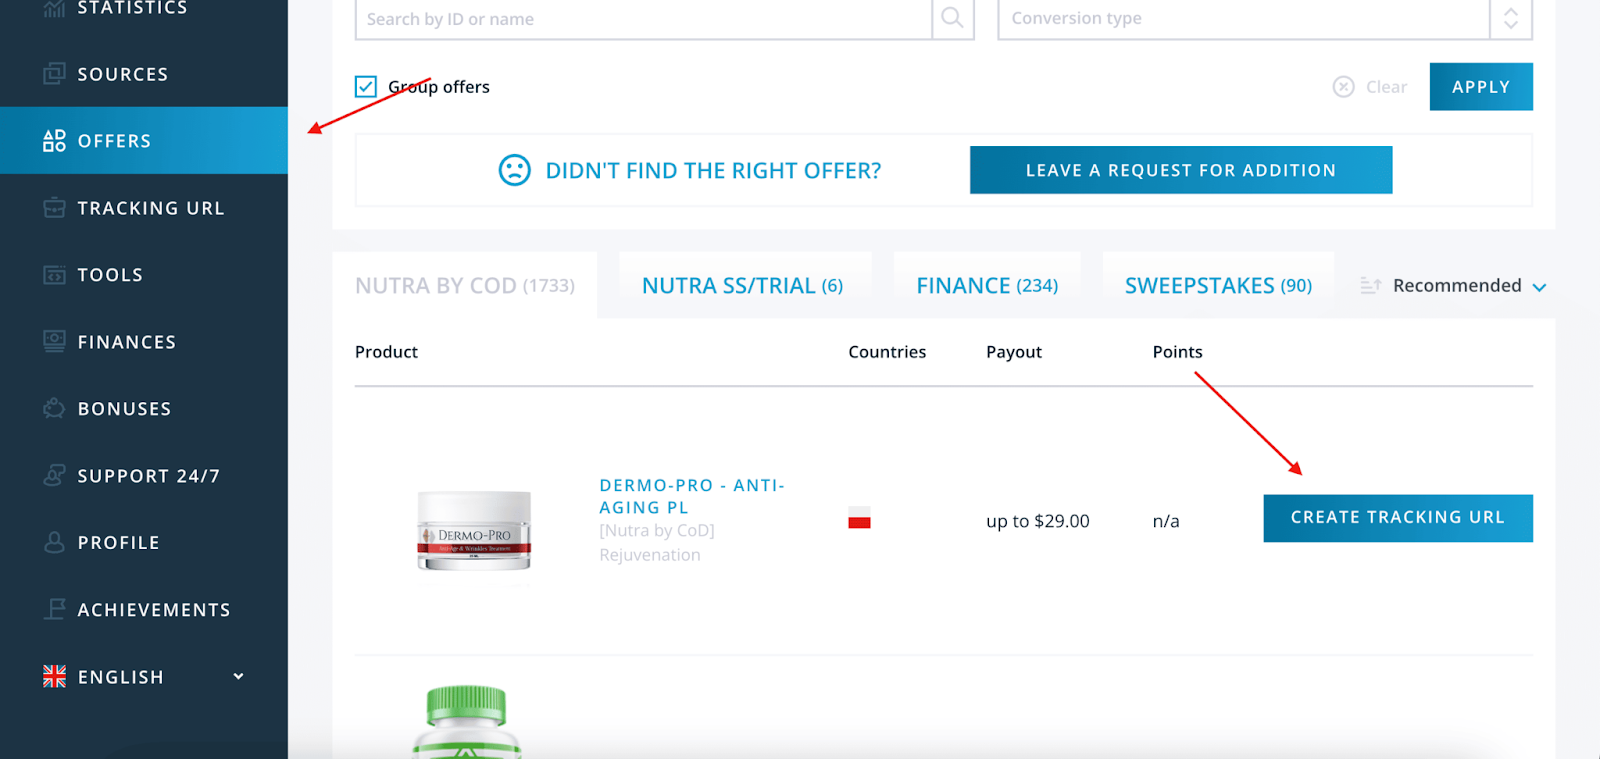
1. Log in to your affiliate network and select the offer you want to promote. Then click “Create tracking URL”.
2. In the next window enter the name of the flow, select ROIads in the sources list and the landing page where you will be launching traffic. When this part is ready, go to the next step.
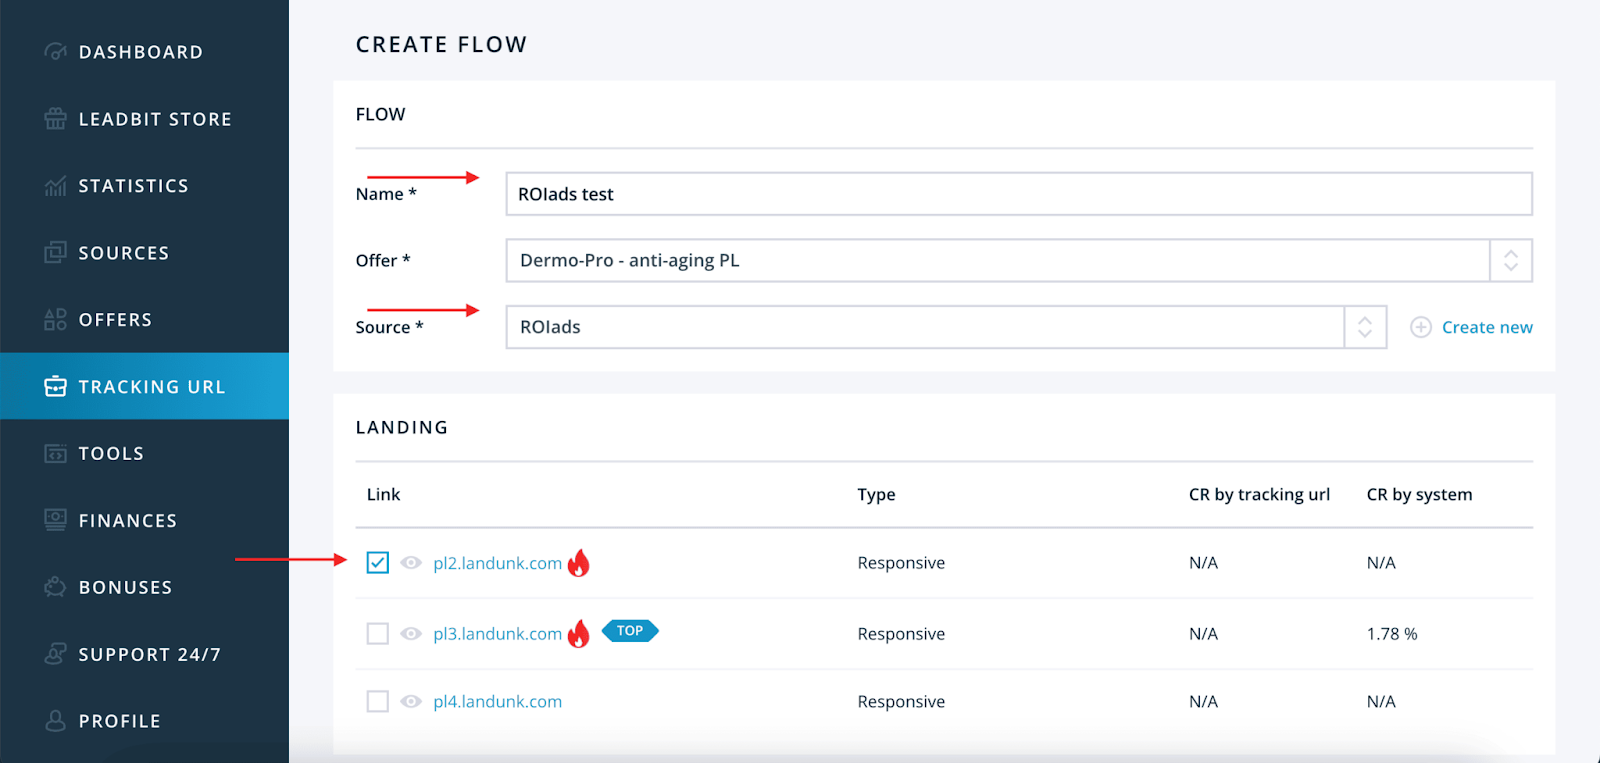
5. Paste the link you saved earlier in the needed field. Then click “Create Flow”.
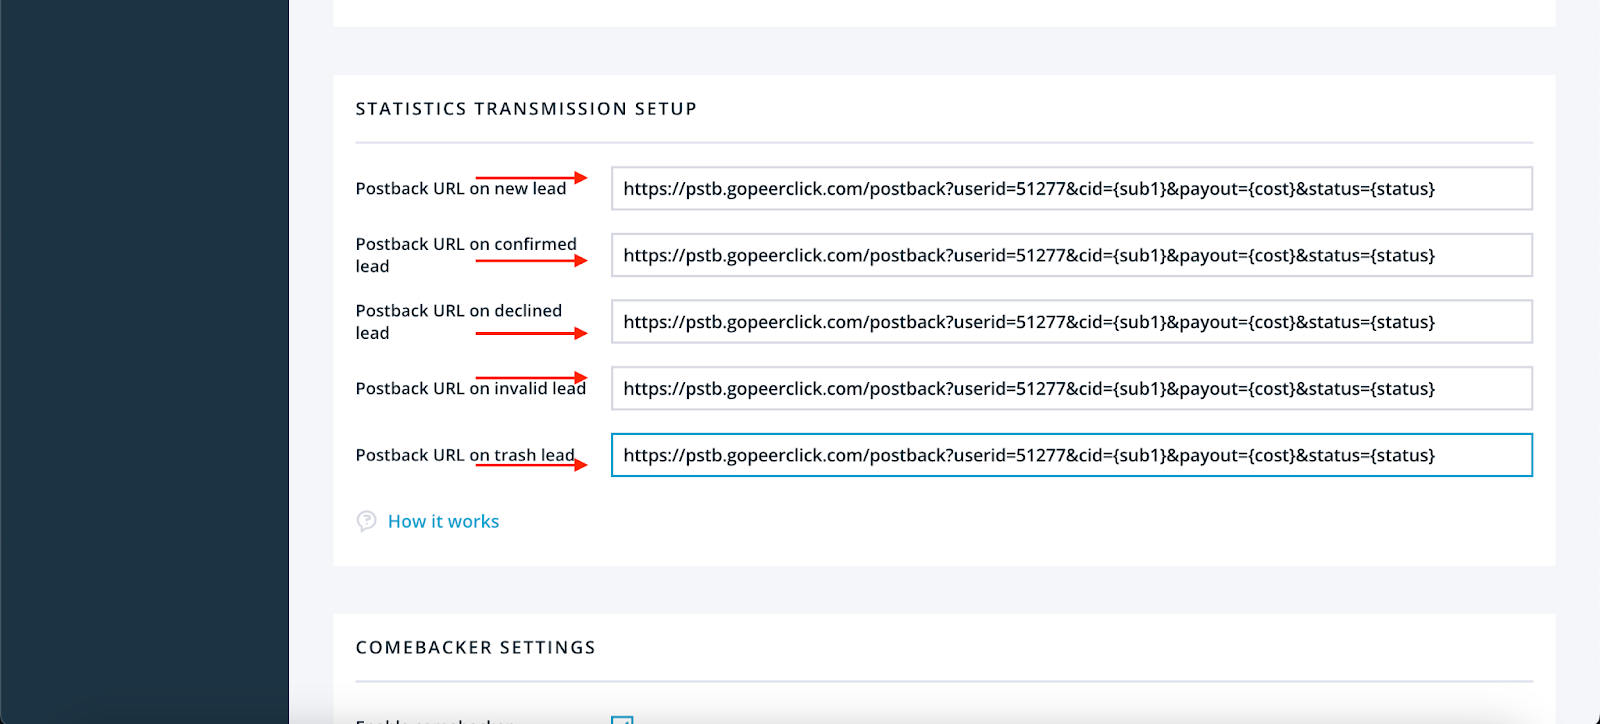
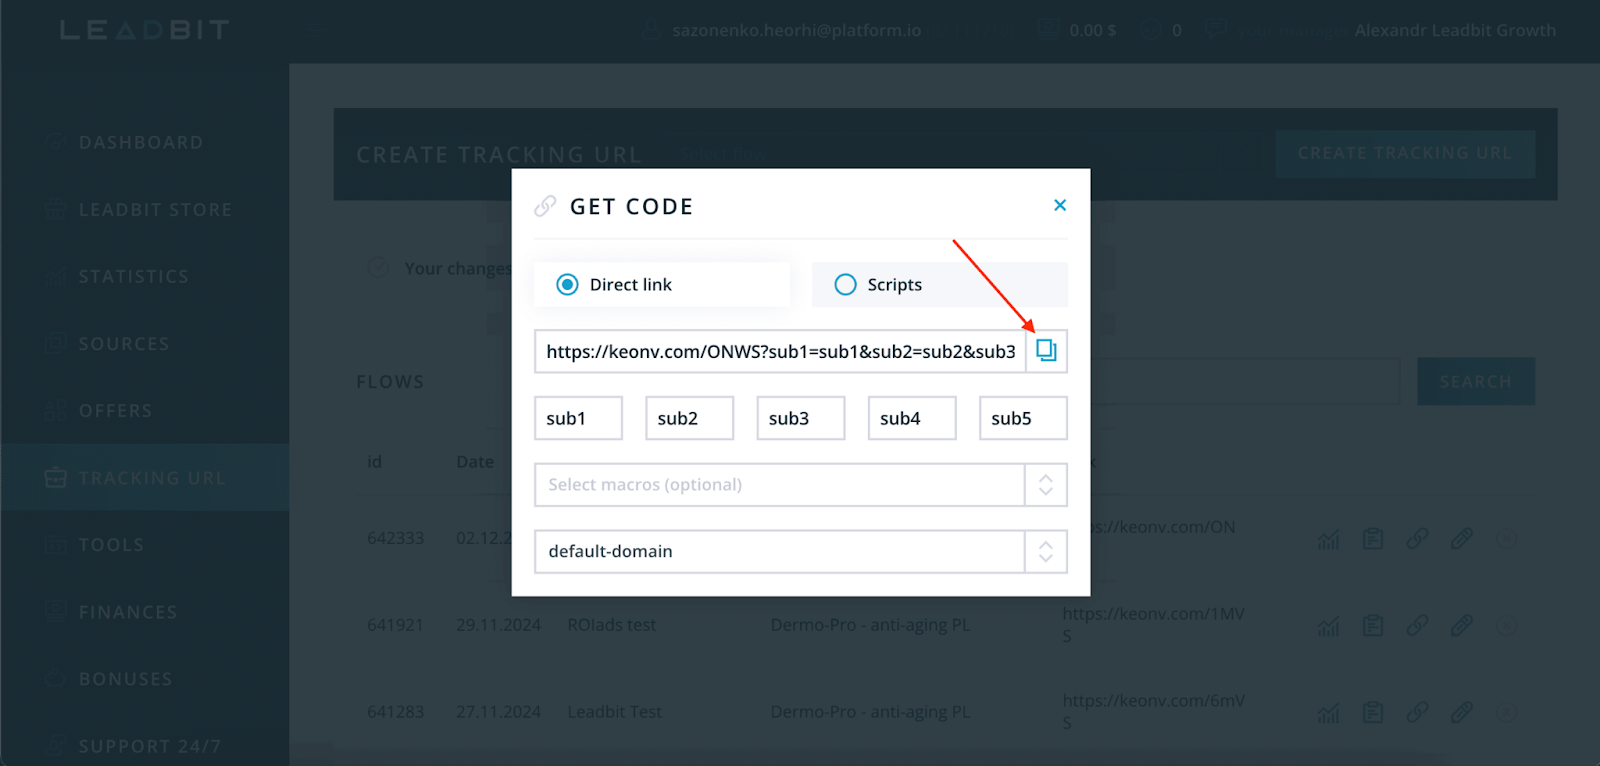
6. After the previous step you will be in the flows section. Find the link icon in the flow you created and click on it.

7. After that, you need to copy the link in the opened window and save it.
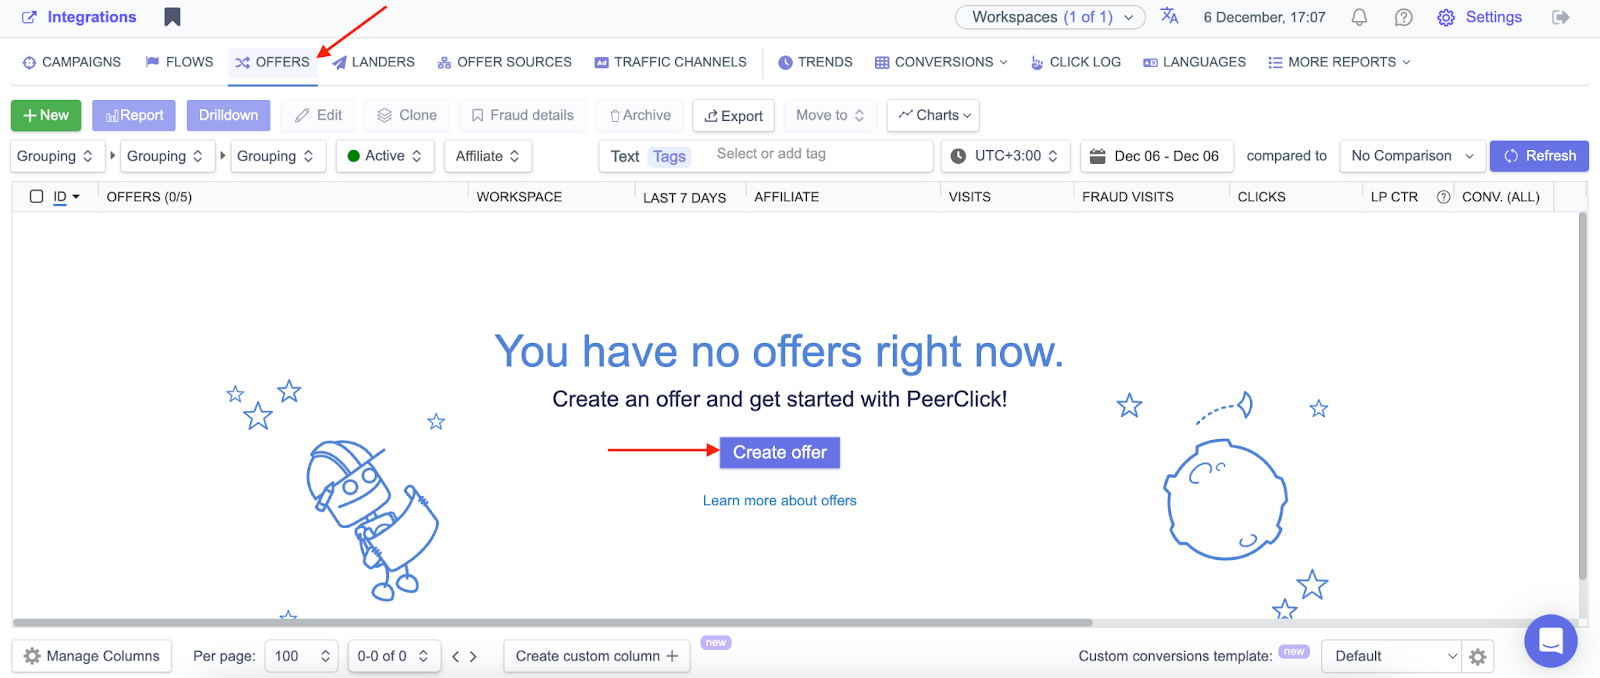
8. Go back to PeerClick and go to “Offers” on the left side of the top menu. Click “Create offer” and select “Offer”.
9. In the setup window add a name to your offer in the “Offer name” field, select your “Offer source” and paste the offer URL from your affiliate network (the 7th point of this step) into the “Offer URL” field. Don’t forget to add the macro that was filled in automatically after you selected the affiliate network from the list to the end of the field after the inserted link. Then click “Create offer” to save.
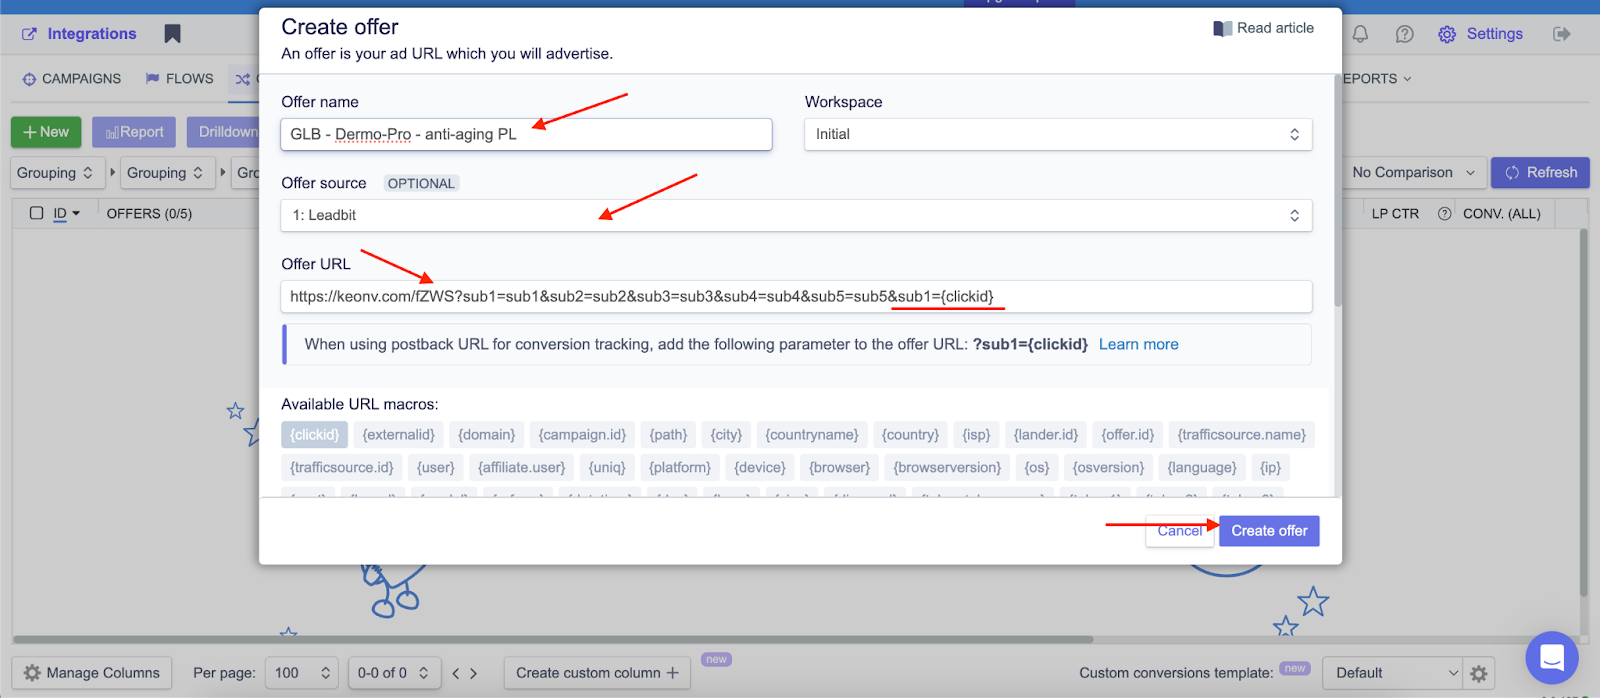
Your offer is now in PeerClick and linked to your affiliate network.
Step 4: Creating a Campaign in PeerClick
Now that everything is set up, you can create a campaign to tie your traffic source, affiliate network and offer together. Here’s how:
1. Go to “Campaigns” in the top menu on the left side of PeerClick. Click “Create Campaign”.
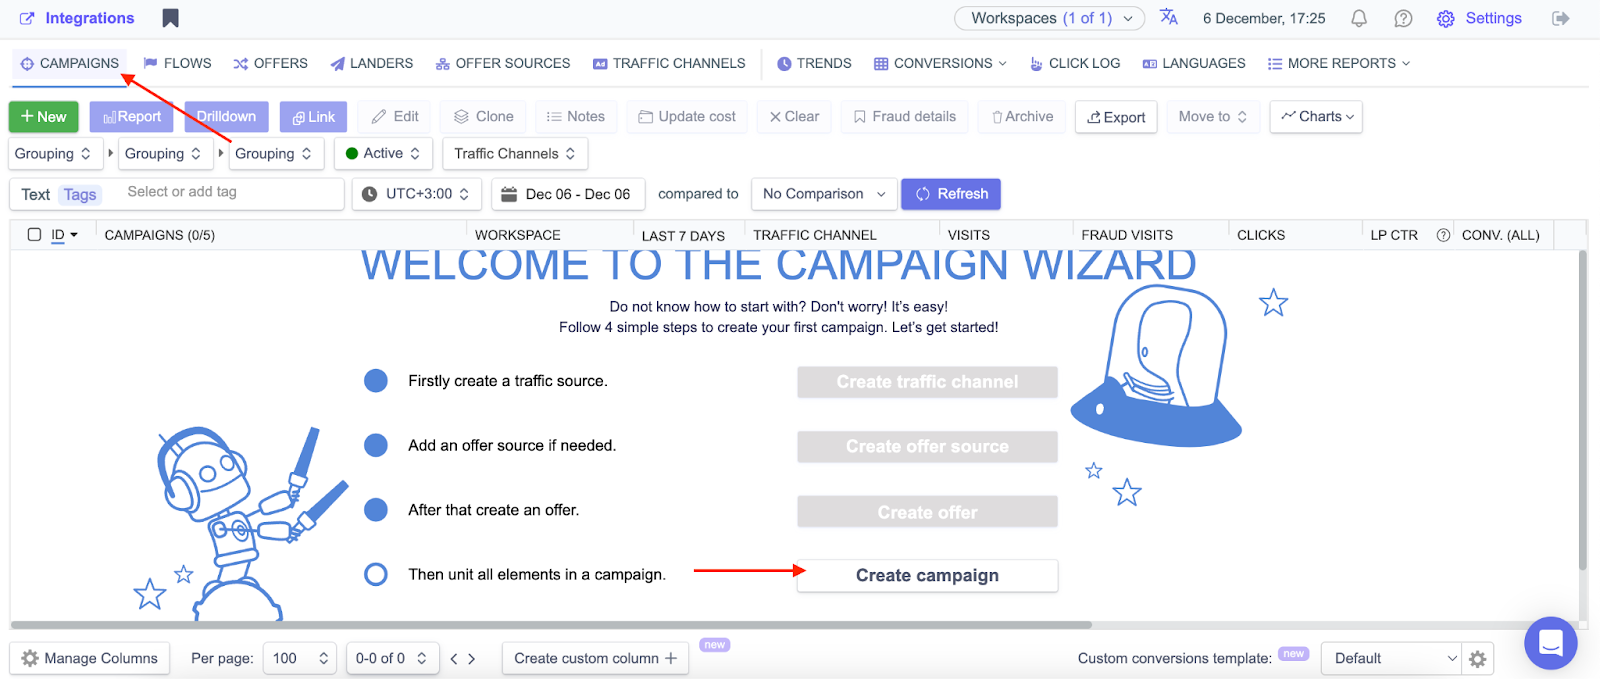
2. Select Your Traffic Source: In the “Traffic channel” field select “ROIads”. Name your campaign for future reference.
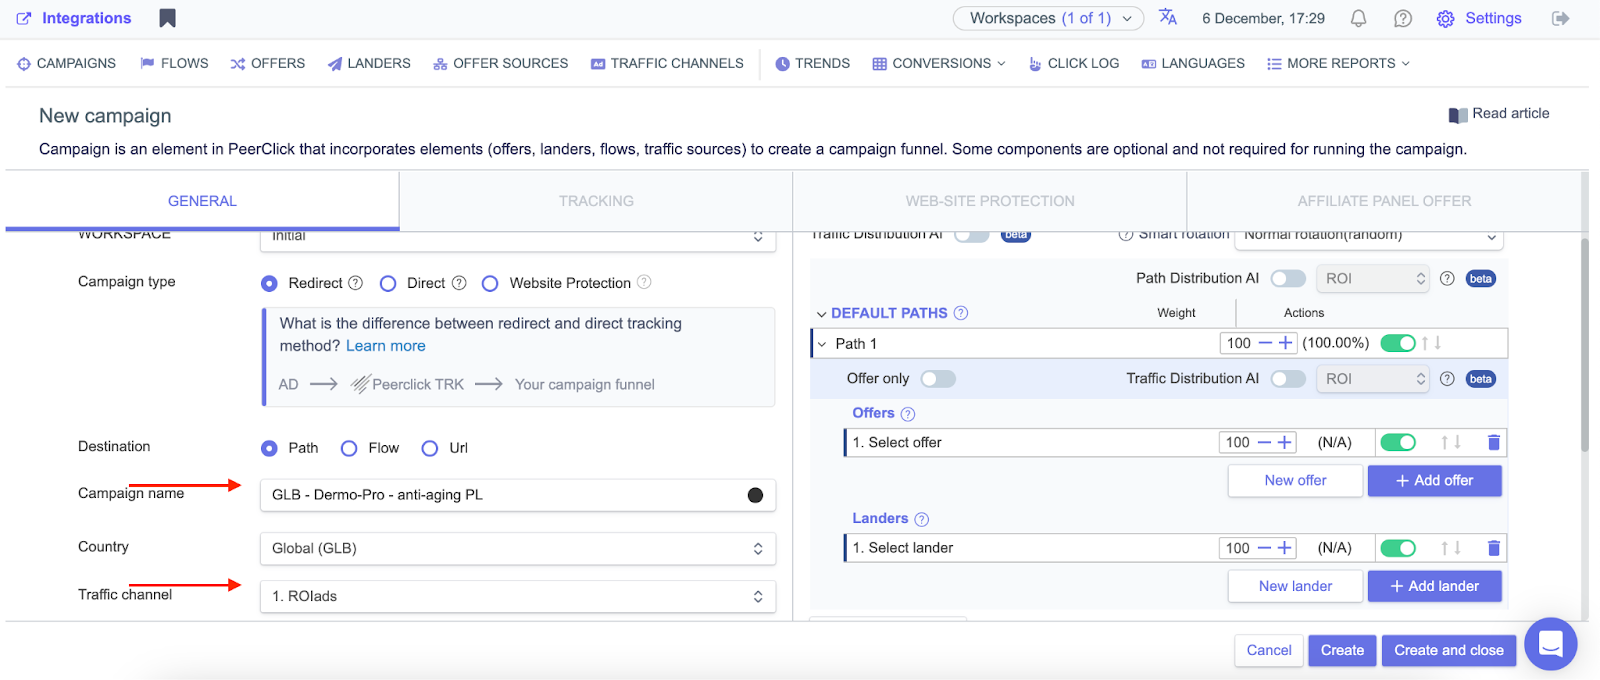
3. Campaign type and data flow: Select “Redirect” for “Campaign type”. Under “Destination” select “Path” and enable. In the “Offers” tab select the offer you created earlier. Then click “Create”.
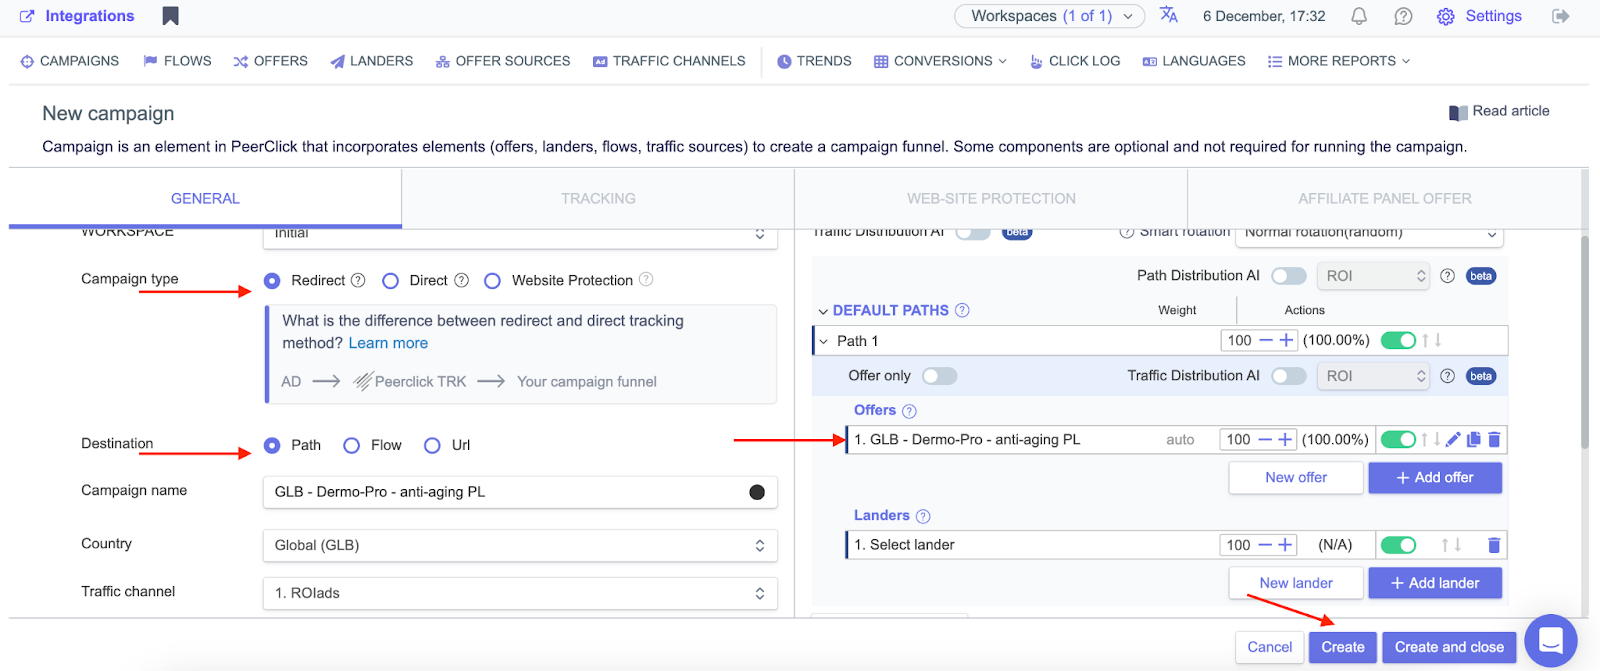
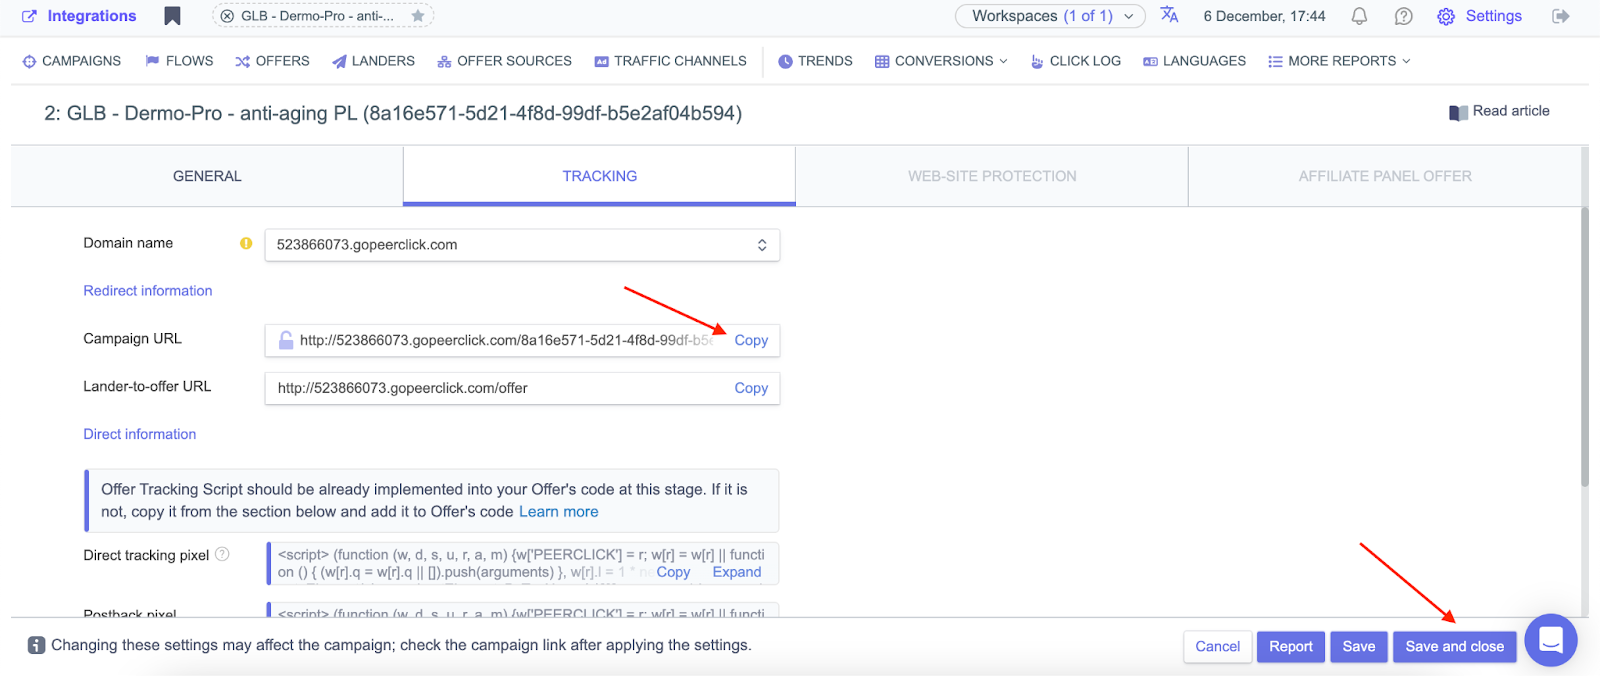
4. In the “Tracking” window that opens, copy the campaign URL and click “Create” again to finish setting up your campaign.
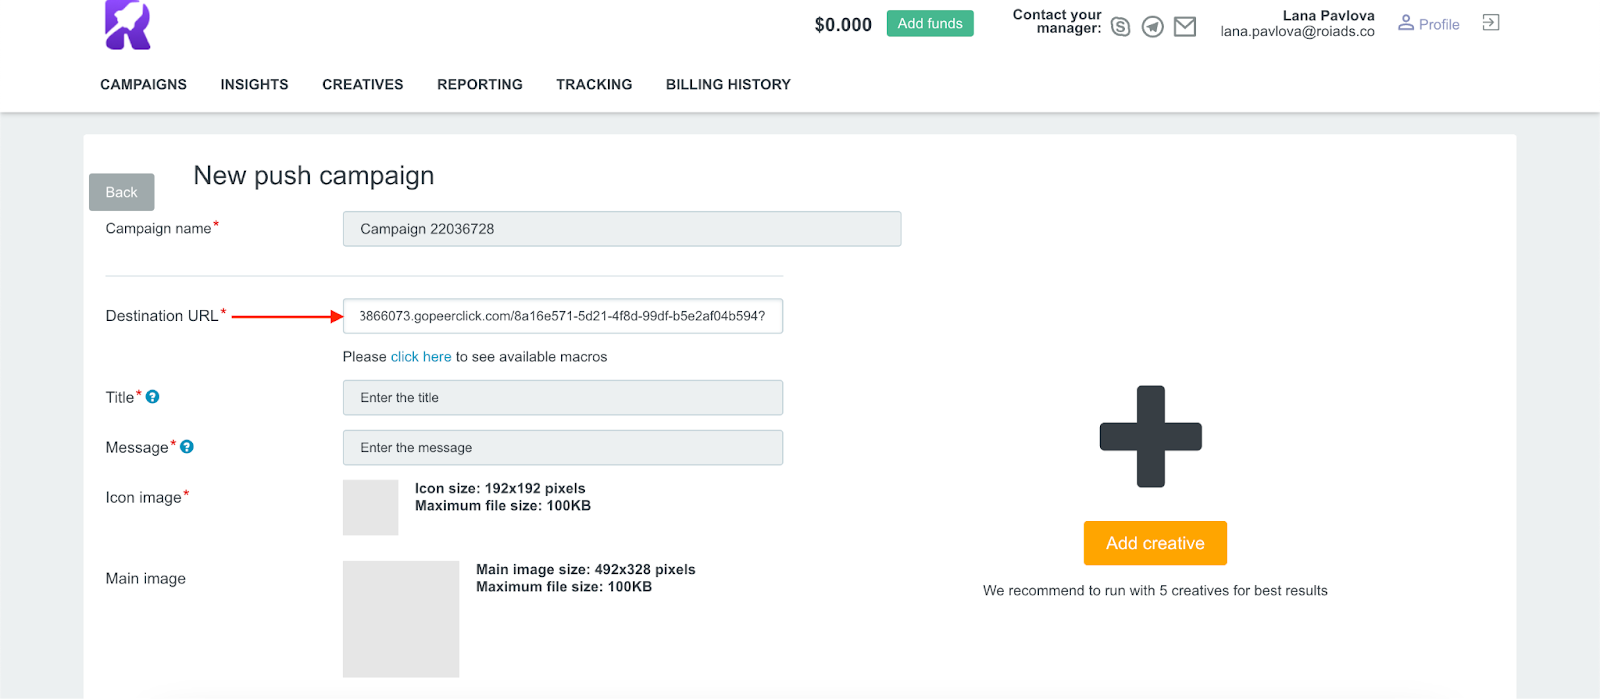
5. Add the Campaign URL in ROIads: Log in to your ROIads account, create a new ad campaign and paste the URL in the “Destination URL” field.
Done! You successfully set up PeerClick integration and the campaign is now ready to run, and PeerClick will track all clicks and conversions for you. Now it’s time to set up your ad campaign. Check out our guides on how to run a push and pop ad campaign.
Conclusion: Take Your Campaigns to the Next Level with ROIads
Now you know how to connect PeerClick with ROIads to track conversions and get the most out of your campaigns. ROIads has AI bidding technology for automated budgeting and Micro bidding for granular control over traffic sources. With conversion tracking on top of that, you can get the most ROI out of every campaign.
Get your traffic to profit. Don’t wait — launch your first campaign with PeerClick ads tracking integration in ROIads now! Also, check out our ROIads review to learn more about the platform and tips for your campaign settings.
